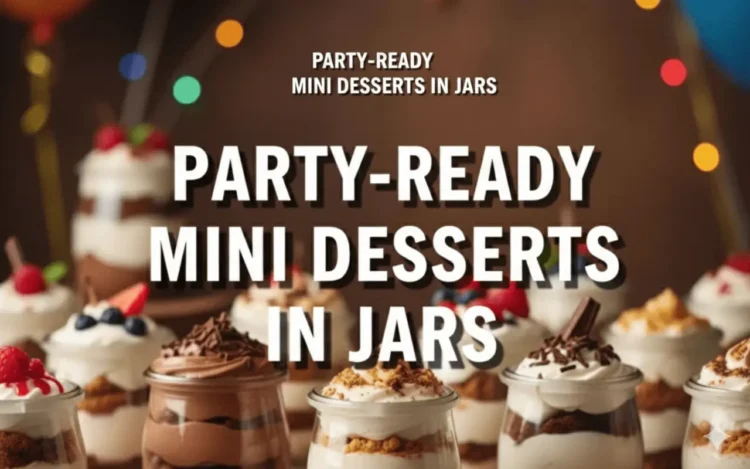
Imagine this: adorable rows of glass jars full of layers of delicious, creamy desserts on the table at your party! Your guests grab one, a spoon and take their own personal dip. No plates required, no mess to clean up, and everyone has their own perfect serving. That is the wonderful thing about mini desserts in jars!
These little guys have become the most popular thing to serve at parties and it’s not hard to see why. They’re adorable, convenient and totally customizable. Whether it’s a cake to bring to a birthday party, warming bread for breakfast on the go or tortes, pies and muffins that are good enough for your next Cougar Town viewing party (never forget that episode), these desserts in jars make you look like one step ahead of the mature pack without spending hours at pâtisserie.
In this article, we’ll run you through how to make mini-desserts in jars that look and taste amazing. Whether learning how to select the perfect containers or conquer crowd-pleasing recipes, find out just why these petite sweets are bound to make a big impression at any party.
Why Mini Desserts in Jars Are Ideal For Parties
Here’s why these handheld treats on a stick are such party superstars. First of all, portion control is a snap. Nobody’s batting it out over who got the slightly larger piece or agonizing over keeping slices a perfect size. All the jars are equal, so dessert for thee as well.
Presentation is massive as well. When you have a dozen mason jars filled with rainbow-colored layers lined up, it translates into an Instagram-worthy presentation that makes your dessert table look professionally styled. Connect with your guests before they even have a bite!
And here’s a bonus: many of these you can prepare in advance. I mean, we’re in days in advance for some of these recipes. Awesome! You can package them up, put them in the fridge and forget about them until party time. Which means less stress on the day when you have 34 million things to think about.
Cleanup is ridiculously simple. Distribute spoons, allow people to enjoy the contents of their jar and toss the disposables or collect the glass jars to wash later. No plates scraped clean, no half-eaten cake sitting on the counter to dry out.
Choosing Your Jars: Size, Style and What Works Best
All jars are not created equal on dessert duty. Here’s a rundown of your options, so you can choose the best containers for your party.
Small Mason Jars (4 oz): These are perfect portioned for dense desserts that you kill for me like cheesecake or chocolate mousse. The petite scale avoids dessert overload but with maximum flavor. They are also budget friendly if you’re making them for a crowd.
Medium Jars (8 oz): If most party desserts fit in a 4 or 6oz jar, this is the magical size that will work for anything. There’s room for a couple of layers, plenty of filling and a few garnishes. The half pint mason jar is the most common in this class.
Parfait Cups with Lids: If you’d like the layers to be visible, straight-sided clear cups are ideal. They showcase your layering finesse and make the dessert look even more irresistible.
Vintage Milk Bottles: Little milk bottles are great for a rustic or retro feel. They’re charming in puddings and custards.
If you’re transporting desserts or making them in advance, shop for jars with lids. Larger mouths are easier to fill and eat out of than small ones. And make sure, if you’re purchasing decorative jars, that they’re safe for food.
Read more: Try these 7 Easy Chocolate Treats Ready in Minutes
What You’ll Need: Essential Tools and Ingredients
Before you dive into your dessert jar extravaganza, make sure to have all of these essentials on hand. The right tools can help the entire process go more smoothly and make it fun, too.
Kitchen Equipment
- Piping bags or large ziplocks (for clean layers)
- Long-handled spoons for easy eating
- Measuring cups and spoons
- Mixer with beaters (for whipped cream and mousses)
- Offset spatula (for smooth tops)
- Funnels – you don’t need them, but they help with the crumbly layers
Pantry Staples
Stock your kitchen with these basics and you’ll be prepared to make most jar dessert recipes:
- Heavy whipping cream
- Cream cheese
- Powdered sugar
- Vanilla extract
- Graham crackers or cookies (for crusts)
- Gelatin or pudding mixes
- Fresh fruits
- Chocolate chips
If you keep these ingredients in your pantry, you can pull out all the stops for fantastic desserts without running to the store when party planning season rolls around.
Best Mini Desserts for Parties and More
Let’s dig into some crowd-pleasing recipes that do the trick when served in jars. These options run from super simple to slightly fancy, so you can select according to your skill level and the time you have.
Classic Cheesecake Jars
This no-bake version — perfect and delicious. Begin with a graham-cracker crust on the bottom (crumbed-up crackers bound together by melted butter). Whisk together cream cheese, sugar and vanilla until smooth, stir in flavored whipped cream – pipe into jars. Add the fruit pie filling or fresh berries. Chill for at least 2 hours. The result? Creamy, dreamy cheesecake that’s just as good as any bakery style version.
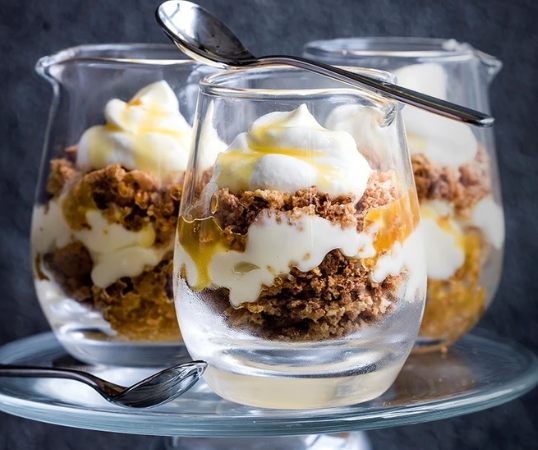
Chocolate Brownie Trifle
Cut homemade or store-bought brownies into cubes. Spread them with chocolate pudding and whipped cream. Toss in some chocolate chips or crushed Oreos between layers for additional texture. This dessert is luscious, decadent and nobody can resist it. Pro tip: Get the brownies a day ahead so they’re easier to cut into clean cubes.
Strawberry Shortcake Layers
Cube pound cake or angel food cake, and layer with slices of fresh strawberries and vanilla whipped cream. The strawberries juice into the cake, leaving pockets of fruity flavor. There is something refreshingly light about this old school summer dessert, making it ideal for picnics and garden gatherings.
Banana Pudding Perfection
Classic banana pudding works so well in jars. Layer vanilla wafers, bananas and pudding combined with whipped topping. The cookies soften a bit as they sit, giving these delightfully chewy bits. Garnish with a wafer and some crumbs if desired.
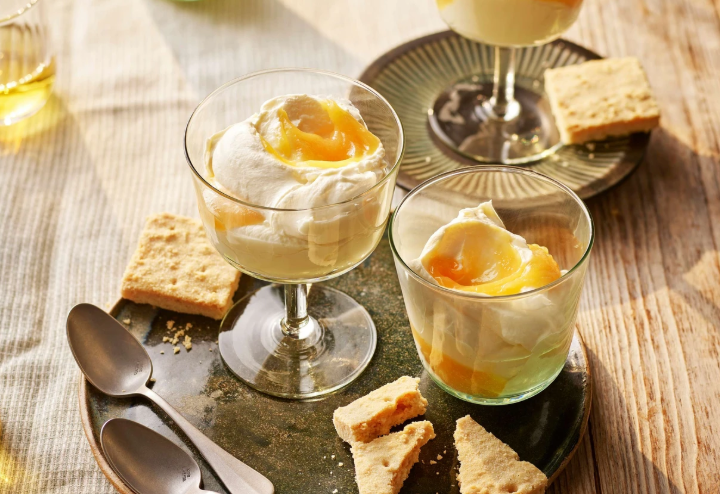
Lemon Blueberry Delight
For something tart and bright, give lemon curd (store-bought is A-ok!) a shot – layered with whipped vanilla cream and fresh blueberries. Stir in some crushed-up shortbread cookies for texture. It’s a combination that translates to sunshine in a jar.
Standout Layering Techniques for A Pro-Level Dessert
How you layer your desserts can totally change what they look like in the end. Use these common sense tips to make picture-perfect jars every time.
Build on a Strong Foundation: The top layer layers the bottom. If it’s crumbly, they go at the bottom if it is compact and dense they stay there. A crust of crushed cookies, cake cubes or granola acts like a floor and won’t float up through softer layers.
Opt for a piping bag for clean layers: Fill a piping bag (or ziplock with the corner snipped off) with puddings, mousses or whipped cream. Pipe around the inside edge of jar first, then fill in center. This helps you avoid smudgy prints all over the glass.
Leave layers exposed: If you prefer guests to see pretty layers, pipe all along the sides of the jar. For less tricky desserts where the layers don’t matter as much, you can just spoon ingredients in.
Consider Color Contrast: Switch back and forth between light and dark layers for the most impact. White whipped cream on dark chocolate pudding or red strawberries provides drama and allure.
Don’t Fill to the Brim: Leave a half inch of headspace at the top. That leaves room for a garnish and it means you won’t spill when people are carrying their jars around.
Recipe Timing and Storage Tips for Seamless Shindig Hosting
The great thing about jar desserts is the ease of making them ahead, but timing does matter depending on the recipe.
Make-Ahead Timeline
| DESSERT TYPE | BEST MADE | MAX STORAGE | STORAGE METHOD |
|---|---|---|---|
| Cheesecake-based | 1-3 days ahead | 4 days | Refrigerate with lids |
| Pudding desserts | 1-2 days ahead | 3 days | Refrigerate with lids |
| Trifles with cake | Same day or 1 day | 2 days | Refrigerate covered |
| Mousse desserts | 2-4 hours ahead | 2 days | Refrigerate with lids |
| Fruit-topped desserts | Add fruit within 1 hour of serving | Same day or within a few hours of serving | Refrigerate |
Storage Pro Tips
Make sure to use clean jars to prevent contamination. Screw on lids to prevent refrigerator odors from being absorbed by desserts. If you’re concerned about condensation, insert a paper towel between the jar and lid. If transporting, nestle jars between towels in a box to keep them from clinking and breaking.
Inspiration for Toppings to Finish With Flair
And the garnish on top makes your dessert go from good to glorious. Here are ideas that bring beauty as well as flavor.
Fresh Fruit: Berries, sliced kiwi, or citrus slices bring color and freshness. Add them at the last minute so they don’t become soggy.
Whipped Cream Swirls: Pipe a rosette of whipped cream on top and dust with cocoa, cinnamon or colored sugar.
Cookie Pieces: Place a cookie, biscuit or wafer standing upwards in the cake. Mini cookies, Pirouettes or a fancy wafer can provide height and intrigue.
Chocolate Drizzle: Melt chocolate and let it run over the top with a fork or squeeze bottle. This does particularly well for lighter-colored desserts.
Flowers You Can Eat: Nothing sets the tone for a more sophisticated event like an edible flower does to make a dessert look like it came from an expensive French bakery.
Crushed Candy: Peppermint, toffee bits or crushed candy canes provide crunch and a hit of flavor.
Nuts and Seeds: Toasted slivered almonds, chopped pecans or even pumpkin seeds add a crunch.
Mix and match toppings to complement your dessert flavor and party theme. Don’t overcomplicate it – simplicity is best!
Theme Suggestions That Suit Any Occasion
Pairing your jar desserts with your party theme brings a uniformed and well thought out feeling that guests will feel and appreciate.
Birthday Parties: Use the birthday person’s favorite flavors or colors. Add some tiny candles stuck in the dessert for a nice surprise. Fill jar necks with bright ribbon wraps.
Baby Showers: Opt for soft pastels. Experiment with vanilla and strawberry layers (for girls) or lemon and blueberry (boys). Neutrals are beautiful with caramels and white chocolates!
Weddings: Elegant is key. Opt for the classics such as vanilla bean, some champagne infused desserts or a good old dark chocolate resonation. Tie with corresponding ribbon and small tags with the couple’s initials.
Holiday Parties: It’s peppermint and chocolate or gingerbread time at Christmas. Halloween also layers well, specifically orange and black (pumpkin and chocolate). Fourth of July calls for red, white and blue with strawberries, cream and blueberries.
Game Day: Team colors determine your menu. Alternate layers of puddings and whipped cream in the right colors or if you use sprinkles and/or toppings, alternate those.
Budget-Friendly Tips Without Sacrificing Quality
Making stunning jar desserts doesn’t need to be expensive. Here’s how to save money and still wow your guests.
Purchase jars in quantity at restaurant supply stores or online. You’ll also end up paying a whole lot less for each jar than if you purchase them all separately at craft stores. For a one-and-done party, look for disposable dessert cups at dollar stores.
Use store-bought shortcuts wisely. No one has to know that instead of hand-making custard, you set the pudding in a cup. The same could be said for pound cake, brownies and even whipped topping as opposed to whipping the cream yourself.
Choose seasonal fruits. The season can be sipped high and low, and whatever’s in season costs less and tastes better. June summer berries are a lot cheaper than January’s. Let which are abundant now be the guide for what you flavor.
If you’re feeding fewer people, make larger jars rather than more small ones. It’s also often cheaper and simpler (both in time spent and ingredients required) to use two 8-ounce jars than to deal with four 4-ounce jars.
Ignore fancy toppings nobody will remember. Even a simple swirl of whipped cream and one berry looks as festive as something fancy, and it’s pennies.
Common Mistakes to Avoid
This way, you’ll learn from the mistakes of others and your dessert jars will be perfect the first time.
Watery desserts: Wet fillings are guaranteed to create a soggy mess. If your fruit is very juicy, drain it before you use it. Prepare puddings as directed on box – don’t add enough liquid to make them runny, the squares will be hard to layer.
Assembling Too Early: Most jar desserts stand up to time, but wait too long between adding crunchy elements, and they become mushy. Layer with cookies up to 6-8 hours before serving, for the best texture.
Not Considering Spoon Length: Regular teaspoons barely peek into tall jars. Provide long-handled spoons or choose shorter, wider jars to make sure people can reach all the layers.
Not Chilling: Many desserts require chilling time to firm up. Cheesecake has to set, pudding has to thicken, flavors have to meld. Don’t rush this step.
Layering Warm Ingredients: Always let puddings, custards or anything warm cool completely before assembling! Whipped cream will melt, and in a jar condensation is formed.
Adapting Recipes for Dietary Needs
More people than ever have dietary restrictions, and jar desserts are easy to customize.
Gluten-Free: Substitute the graham crackers for gluten-free cookies or crushed, gluten-free cereal. Many puddings are naturally gluten-free. Always check labels.
Dairy Free: Coconut cream whips up gorgeously in place of heavy cream. Use plant-based cream cheese and milk substitutes in puddings. A lot of fruit desserts easily omit dairy, after all.
Low Sugar: Kiwi, mashed bananas, and berries help keep dessert sugars down alongside sugar-free pudding mixes and table sugar substitutes in whipped cream. Just be wary of the sugar alcohols that can upset some stomachs.
Vegan: Use a combination of dairy-free and egg-free. Aquafaba (chickpea liquid) behaves like egg whites when whipped. Vegan cream cheese and coconut cream provide several options.
Just remember to label desserts, especially if you have more than one variety. Because no one wants to take the wrong jar accidentally, especially if they’ve got allergies.
Presentation Ideas To Impress Your Guests
It’s not just the taste of your jarred desserts that matters but how you present them. Set up a dessert table that makes everyone do a double take.
Play with Height: Stack stands of varying heights to add interest. Pile up old books or wooden crates as pedestals for jars.
Dress it up: Use ribbons, twine or strips of fabric to tie around the necks in your party colors. Attach some tiny tags with the names of desserts in calligraphy or cute fonts.
Lighting: Have jars glisten and add ambience — especially during an evening party with string lights or tiny candles nearby the dessert table.
Serving Spoons: Don’t forget the cute spoons to make serving fun from a sweet little dish! Vintage spoons (or bright plastic ones) add a playful note.
Signage: Make a little menu card with what is in each jar. This is for the guests with allergies and to build suspense.
Group by Type: Place similar desserts together rather than everything all scattered. It looks organized too by keeping all the chocolate ones in one section, fruity ones in another and so on.
Taking Skills To The Next Level
Once you become a pro at basic jar desserts, check out these next-level recipes to really make a statement.
Diagonal Layers: As you fill the jars, tilt them to form diagonal layers rather than horizontal ones. Place jars in a muffin tin at an angle and the jam will set leaning to one side of the jar.
Swirled Patterns: Fill 2 piping bags with the same consistency dessert but in different colors. Snip off both of the tips, squeeze together and pipe for a marbled effect.
Suspended Ingredients: For ingredients like chocolate chips, fruit pieces, or cookie chunks suspended instead of sinking, go with a slightly thicker pudding or mousse.
Deconstructed Classics: Think of your favorite dessert classics — apple pie, carrot cake — and reimagine them as jars filled with innovative, modern takes on classic elements.
Adult Only Versions with Alcohol: Kahlua versions of chocolate desserts, rum in banana pudding, or champagne in berry layers as grown up treats.
Frequently Asked Questions
How far in advance can I prep desserts in jars?
Nearly all jar desserts are better if they’re prepared a day or two before your party. Pudding and mousse: 3 or 4 days depending upon how well you have the dessert sealed in your fridge. I wouldn’t go too far in advance since texture can be lost and fresh ingredients may spoil.
What size jar is best for serving a party?
For most parties, 8-ounce jars are the sweet spot. They’re sizable enough to satisfy the impulse to have dessert, but not so unyielding as to defeat the act of eating it. For extremely rich desserts (we’re looking at you, chocolate mousse), go smaller with 4-ounce jars. For any casual backyard gig like this, 8 to 12 ounce jars are perfect.
Can desserts be frozen in jars?
Some of these can be frozen, and some cannot. Cheesecake-style desserts freeze nicely for at least one month. Do not freeze anything with fresh fruit or custards or whipped cream — those items will not thaw out again so easily. Be sure to leave headspace when filling jars and freezing, as the contents will expand.
Do I need special jars, or can I use any container?
Any food-safe container with a lid will do. There are a few reasons why Mason jars are so popular; they’re inexpensive, available in varying sizes and charming to look at. Party dessert cups with lids are really good hand size for all types of foods or party favors. Just be sure containers are clean and not odorous.
How can I avoid soggy layers?
Store wet and dry ingredients separately until ready to serve. Use thick pudding in place of thin puddings. If you are using cake or cookies, put down a thin layer of frosting or cream between them and the juicy fruit. By cooking it four to six hours before you serve, you can generally stop sogginess.
What if my layers of dessert blend together?
It’s important to allow each layer enough time to chill before adding the next one. For puddings and mousses use even thicker consistencies – they should retain any shape when piped. Do not over-fill jars or add too much liquid. If the layers do get mixed, chalk it up to a “rustic” look and run with it!
Can children help make these desserts?
Absolutely! Jar desserts are especially suited for small fry assistance. Kids can crush cookies, layer ingredients, add toppings and decorate jars with ribbons. You just have to keep an eye on the stove for the cooked parts and they can do all the fun assembly bits.
What’s the best way to carry dessert in jars without making a mess?
Line a shallow box with a kitchen towel and in it place jars. Insert extra towels between jars to keep them from touching and clinking together. Always remember to store the box level while in transit. For added protection, close tightly with the lids and place a piece of plastic wrap over the top of each jar underneath the lid.
Wrapping It All Up
Mini desserts in jars designed for a party are the epitome of convenience, creativity and cuteness! They relieve such a host of hosting headaches — no slicing, easy serving, minimal cleanup and make-ahead friendly. And they are just so cute sitting on your dessert table.
Begin with easy recipes such as pudding parfaits or no-bake cheesecakes to build your confidence. Once you’ve mastered the fundamentals, try new flavor combinations, layering techniques and decorative flourishes that speak to your own aesthetic.
And remember: The best desserts are ones created with thought and care, not necessarily the fanciest or most complicated. Anyway, your guests will love having their own individual portion, and of course there was such obvious effort put into making a special end to the meal.
So take some jars, choose a recipe that appeals to you and start making. Whether you’re having a low-key barbecue out back or an elegant gathering, these little jars of sweetness will keep your friends and family asking for the recipe and praising your dessert prowess for weeks to come. Happy party planning!